Showing posts with label Computer Tips. Show all posts
Showing posts with label Computer Tips. Show all posts
Saturday, 4 May 2013
write in Urdu on Facebook in comments and sms
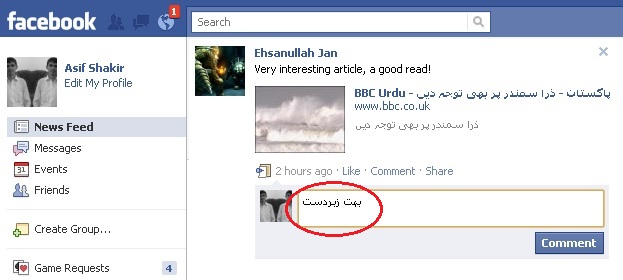
How to write in Urdu on Facebook in comments

Whenever I come online on twitter, FaceBook or any blog or website and want to post the comments in comments area specially whenever i visit my faceBook wall and find some interesting, a thought comes to my mind that I should write comments in my own language for the post, so I google the following phrases..
Open your chrome browser:
Step 1: Open the translate.google.com
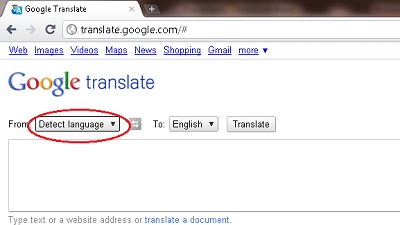
Step 2: Select your desire language from “From Drop Down” as shown in circle.
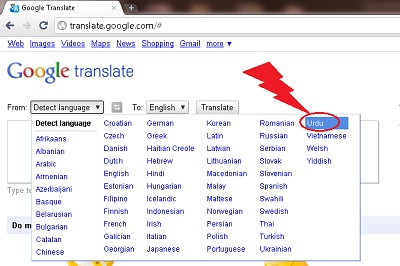
Step 3 : In circle you can see the that I have selected the Urdu language.
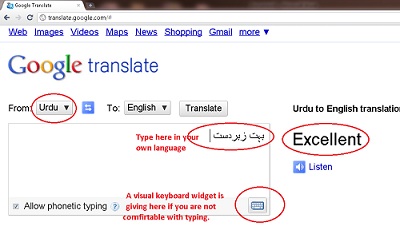
Step 4: After selecting the language now type your comments in given box which you want to post on faceBook wall.
You can also use the keyboard widget to type in your desire language.
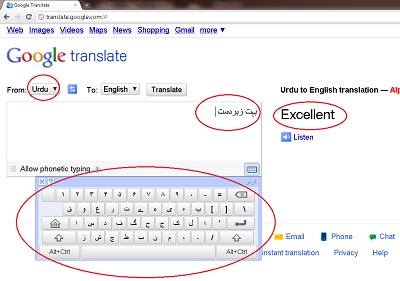
Step 5: and finally copy paste the comment on faceBook wall.
Thursday, 2 May 2013
latest Windows 8 Tips and Tricks
Windows 8 Tips and Tricks
 |
| latest Windows 8 Tips and Tricks |
Windows
8 preview consumer has to buy many of the new features trick our goods 8
that is covered in the window front of us already. However, the most
innovative to date 8 indicates that says it is windows and praise has
been one of the Windows OS of an.
Since it is surprising that just what you fall in love with it, there remains a lot of people there are using the preview of consumers as OS daily. We we decided to share with you our , some of the best trick, most people do not realize that it is not probably still covered.
We are prepared so guide is done using windows 8 wonderful experience.
1. You to disable the lock on the screen.
To lock screen for Windows 8, a very interesting new feature helps you stand apart from previous versions. . However, when you log on, you turn on the PC, so. Including keystrokes extra to get the log from the Lock screen of the screen, here is how to disable the lock screen.
· Type the gpedit.msc Enter to start the Group Policy Editor by pressing the Start menu.
· In the Group Policy Editor and navigate to the personalized template> Control Panel> Configuration> Administrative computer
· Double-click on the Lock screen does not appear , please enable the option. Click [OK]
· Now you can boot it directly to the log of the screen, skip the Start menu, and combine this with, you will be able to boot directly to your desktop.
2. Save the screenshot taken, immediately
This is a new feature that is implemented in Windows. This is just to take a screenshot press immediately. Nari easily take a screen shot and very snappy eight + Print Screen key win key.
3. display the Administrative Tools
Management tool, even if you 8 are hidden by default in Windows is to use them on a regular basis, you can display them again very easily. .
· Press WINKEY + ℃ Click on the menu appeal to Settings [or to display a menu of attractive, and take the mouse pointer to the upper right corner or the bottom of the screen
· After you click Settings, locate the option to display management tool and move the slider to yes
· You can see your management tools on the opening screen, the list of all applications
4. control of automatic maintenance
Have a very good automatic maintenance system to run the eight software updates Windows, security, system diagnostics scan, and then click Run. . By default at 3:00 am You can be changed, that set.
· Please click the flag icon , please click the center click on the icon in the system tray, Open action
· You, please click. You will notice the automatic maintenance under the maintenance category of maintenance to change the settings to customize it
· On this screen, even if the time can be set when you run the maintenance task, the window of you were asleep, you can set it to wake up the window to perform the task.
5. customize the search application
Appears as an option every time you search, there is a subway app. Your application if you have a load of subway, the list is how to trim this option can be crowded here
· Please click, click the charm of the setting of PC configuration more
· Please click on the current search in the setting of PC
· If you do not want the app to display the search options you can slide the
slider to off.
Friday, 26 April 2013
How to Increase USB or Pen Drive Speed With Simple Trick
Trick to Increase USB or Pen Drive Speed

The
Pen drive or USB that you use may not be so slow that it seems to be.
It might be some configuration or settings are missing from your
computer which helps in speeding your USB or Pen drive. So there is
Trick to increase USB or Pen Drive Speed by more than two times. This
trick can improve the USB or Pen drive performance and moreover speed up
the computer to some extent.
Note : Before using this Trick, backup all the data present in your USB or Pen drive.
Note : Before using this Trick, backup all the data present in your USB or Pen drive.
To use this Trick just follow the simple steps :
- Connect the USB or Pen Drive to Computer.
- Open My Computer >> Right Click USB or Pen Drive >> Properties.
- Then on the Hardware Tab select the USB or Pen Drive connected and then click Properties >> Policies Tab.
- Now select "Optimize for Performance" option rather than "Optimize for Quick Removal" and click Ok.
- Now just format the USB or Pen Drive with NTFS File System by selecting format option from the drop down menu of formatting.
Now it is done.
Top 5 Tricks and Tips to Boot Up Computer Faster
Top 5 Tricks and Tips to Boot Up Computer Faster

1)Regular Hard Disk Checkup
Over the Time
Hard Disk gets Degraded not only Physically but also Digitally. So it’s
Important to Monitor the Hard Disk's Drive Health. Any Error or Damaged
Sector can throw the Software Loading into an Infinite Loop and thus
Causing the Long Load Times. So to check the Hard Disk's Drive Health
follow these simple steps :
- Click Start >> Computer >> Right Click the Partition to be Checked >> Properties >> Tools.
- Now
Under " Error - Checking ", Click " Check Now ". Now a Pop Window will
come and on that Check the both Options i.e. " Automatic Fix File System
Errors ", and " Scan For and Attempt Recovery of Bad Sectors ".
- After this the Error Check would Start and it might take some Time according to the Disk Size.
- Now Hard Disk Check Up has been Completed.
2) Eliminate Startup Delay
To get Faster Boot Up Speed, We can cut the Boot Delay to 0. The delay is in place to allow your Startup Processes some Breathing Room during Loading. The Default Delay is 30 seconds and We can Change it to 0 and Eliminate it for Faster Boot Up Times. So to Eliminate the Startup Delay follow given below Steps :
- Click Start >> Run >> Type " msconfig " ( Without Quotes ) >> Press Enter.
- Now the System Configuration Utility Windows will Open.
- Now Click Boot Tab. In the Boot Menu, Change the Default Setting for the Time Out from 30 any Less Number of Seconds You Want.
- We Recommend the minimum of 3 Seconds.
- Now Startup Delay has been Eliminated.
3) Organize the Hard Disk
Over the Time, Storage System of the Hard Disk gets Disorganized So we need to Reorganize this Storage System on the Hard Disk. Windows has a Default Utility called Disk Defragmenter that will put the Hard Disk of the System in Order. So to use this Utility follow given Below Steps :
- Click Start >> Computer >> Right Click any Disk Drive >> Properties >> Tools.
- Choose Defragment.
- Now in the Disk Defragmenter Utility, Click Defragment.
- You have to Defragment each of the Disk Partitions Individually.
- Now the Organization of Disk has been Completed.
4) Remove Unwanted Startup Programs
Whenever we Install a New Program, most of them Opts to Load on the Computer Startup. The process of Loading Up these Programs at Startup can reduce the Booting Times. So We need to Reduce these Startup Programs. So to Reduce and Disable the Unwanted Startup Programs follow given below steps :
- Click Start >> Run >> Type " msconfig " >> Press Enter.
- Now the System Configuration Utility will Open. Now Click Startup Tab.
- Uncheck the Programs that You no Longer Want to Run on the Startup and Click OK.
- Now Unwanted Startup Programs have been Removed.
5) Remove Unwanted Startup Services
There are many Windows Services which also requires the Loading Up at Startup and can reduce the Booting Times. So We need to Disable these Startup Services. So to Reduce and Disable the Unwanted Startup Services follow given below steps :
- Click Start >> Run >> Type " msconfig " >> Press Enter.
- Now the System Configuration Utility will Open. Now Click Services Tab.
- Uncheck the Services that You no Longer Want to Run on the Startup and Click OK.
- Now Unwanted Startup Services have been Removed.
So these are Top 5 Tricks and Tips to Boot Up Computer Faster.
Subscribe to:
Posts (Atom)
